Monday, August 10, 2015

DIY Seashell Encrusted Candlestick Tutorial


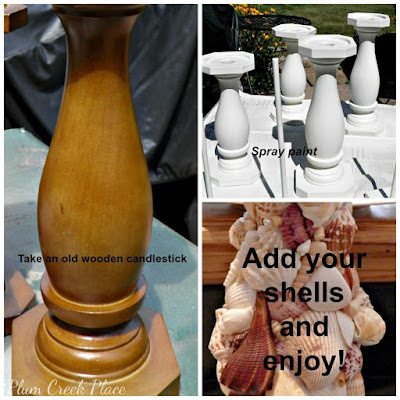
My Pinterest obsession has kept me very busy lately.  Not only do I find myself compulsively pinning but actually trying to create copycats of the items that are really striking my fancy.  The candlestick shown below is the product of one of my endeavors.  I am very pleased that they came out nicely.  I am also proud to report I only burned myself once with the hot glue gun and that the burn barely hurt at all. Wahoo!!!
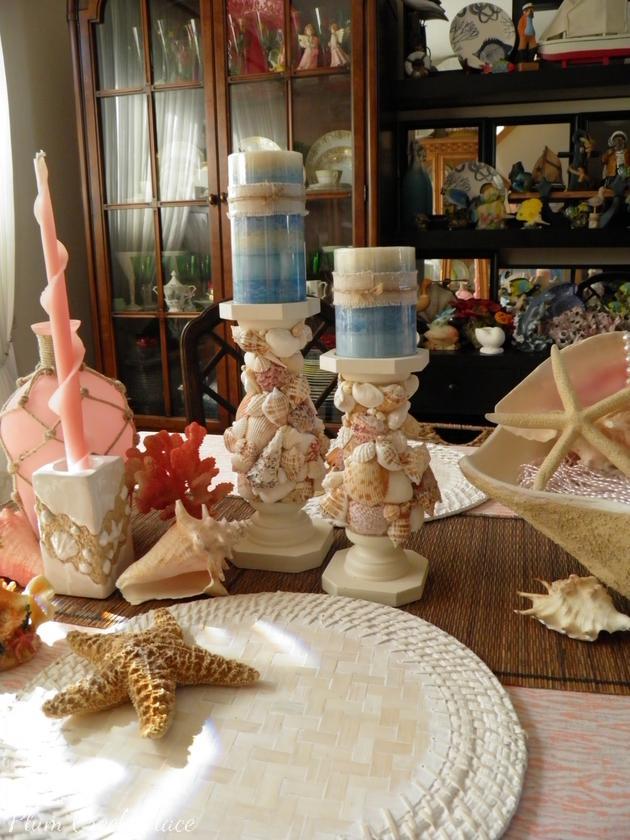
seashell candle sticks, DIY, tutorial
I started with two large and and two medium candle holders from Walmart, all four
were purchased at thrift stores (one set over a year ago and one set this spring).
I had already painted one of each size last year.  


   I took both sets outside and painted the wood finish with three coats of Rust-oleum's  
Paint Plus 2X ultra Cover in Heirloom White in the Satin finish. I freshened the candle holders that had already been repainted with another light coat of the same color.

.
 I let them dry several hours outside before bringing them into the house.  They sat on the mantle over a week to let the paint cure a bit before I started gluing shells onto the freshly painted surface.
I gathered up the shells that I had been collecting from the thrift stores for several years.
And set them on my kitchen island so that I could sort them by size and shape.
 I also had bought a couple of bags of small shells from Marc's for just $1.49 per bag.
Love that Marc's close out section.
 With the hot glue gun warmed up and an assortment of makeshift tools
 I glued a few shells at a time in tandem to the candle holders. 
 Seashell encrusted candle holders - Plum Creek Place DIY Tutorial
 I started at the bottom with just a couple of shells
 As I finished each section on each candle holder I would
set it aside to let the glue harden and set up.
 Seashell encrusted candle holders - Plum Creek Place DIY Tutorial
  I added shells from left to right and building upward while matching the shells as best as I 
could on each of the holders as I went along. When I was about thirty percent done
 I set them aside for twenty minutes so they could set up.
(while I started dinner)
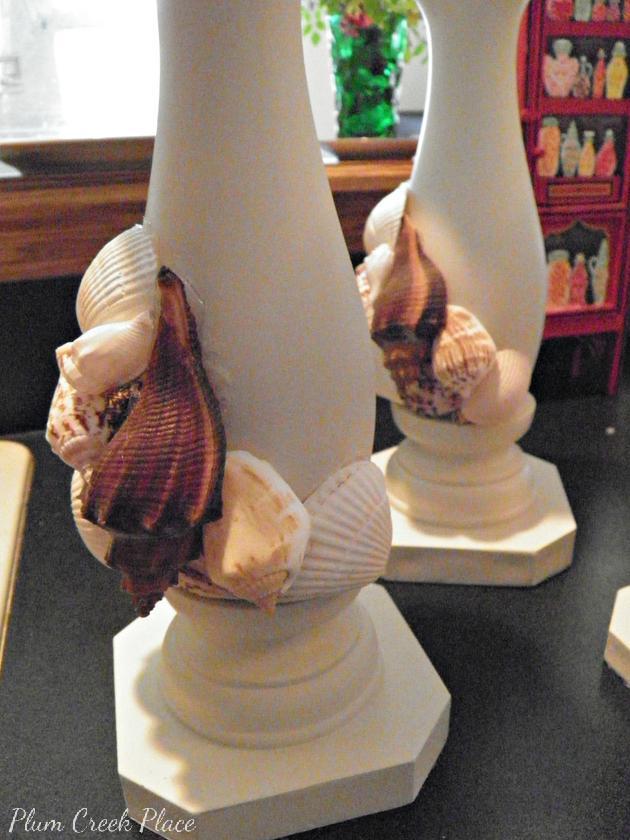
Seashell encrusted candle holders - Plum Creek Place DIY Tutorial

 As I progressed with the gluing I would compare the holders to each other to make
sure that the pattern was staying consistent on all of them.
Seashell encrusted candle holders - Plum Creek Place DIY Tutorial

 When I was about two thirds of the way up with the shells on the candle holders
I switched to the top row and started filing the open space
between the top row and the bottom two thirds
 of the candle holders.
  Right about then my back started to hurt.  I set up a TV tray between the island and the kitchen 
counter so I could sit down to finish gluing the shells.
 Seashell encrusted candle holders - Plum Creek Place DIY Tutorial
Once the shells were all in place I started placing tiny shells into any small
empty gaps between the shells.
Seashell encrusted candle holders - Plum Creek Place DIY Tutorial
Easy Peasy!
Seashell encrusted candle holders - Plum Creek Place DIY Tutorial
 Here is a sneak peak of my tablescape for Thursday.
I am celebrating my second blog anniversary this month by sharing a set of fall tablescaping linens from Park Designs.  The pattern is called Indian Summer and includes a 60" x 84" tablecloth, and a set of napkins. If you are one of my followers (on Google plus or Blogger) and leave a comment on this post or on my "Seashells and Roses" tablescape coming up on Thursday August 13, 2015 (that I will be sharing at Susan's "Tablescape Thursday") you will be in on the drawing.  The lucky person (aka winner) who's name is drawn will be announced at my post for August 20th, 2015

Tablecloth description: 
Park Designs Indian Summer Collection, Windowpane checks are complimented with bands of chocolate and tan with pinwheel corners. The Indian Summer 60 x 84 Tablecloth is a lovely year-round table covering.
 http://cdn3.bigcommerce.com/s-w9efhh9i/products/27830/images/25359/52644__30624.1405023650.380.500.jpg?c=2
Remember to thrift on ladies, thrift on!

Sharing at:

Susan's Metamorphosis Monday

Marty's Inspire Me Tuesday


Friday, August 7, 2015

DIY Giant Clam Shell And Sunrise Seashell Tablescape

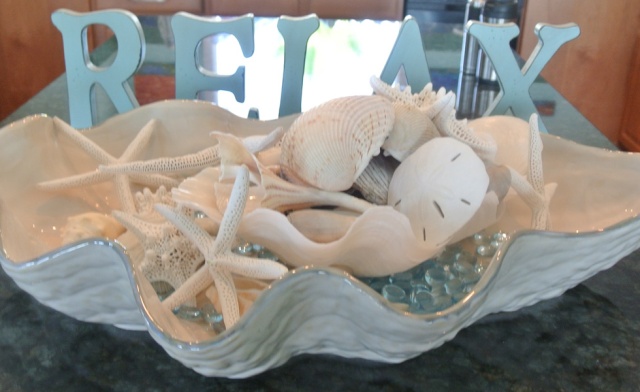
Darn that Pinterest!  I have spent hour after hour looking at pins of wonderful inspirational coastal ideas.  I was so inspired by pictures of giant clam shell candle holders from Pottery Barn that I had to try to make a copycat giant clam shell like theirs.  Jenna at The Painted Apron created a wonderful coastal setting using a a large Pottery Barn clam shell that I just adore.  Pottery Barn also offered an organic and rustic looking clam shell more recently that I kind of liked too.  There were others that I found on Pinterest but these two were the most inspiring giant clam shell pins for me.  I tried to combine a bit of the character from each of these lovely large clam shells and came up with THIS......
DIY giant clam shell - Plum Creek Place
A little bit rough and a little bit sleek,  a combination of the inspirational photos that I found while looking for Coastal "By The Sea" pins.
You can see the details about this PB clam shell here - http://www.potterybarn.com/products/giant-clam-shell/  Notice the rough and coarse finish on this PB shell.
 Giant Clam Shell

You can see Jenna's "Seafood Lunch" post here -      http://thepaintedapron.com/2012/09/20/tablescapes-seafood-lunch/  See how beautiful and sleek Jenna's shell looks. 

The Painted Apron Giant clam Shell
I started with a clear plastic (acrylic?) clam shell bowl.  Amazon has a similar bowl like this in white available here at Amazon.
DIY Giant clam Shell - Plum Creek Place
I found two large clam bowls and three smaller ones at a garage sale at a very reasonable price early in the summer.  When I saw them I grabbed them up right away for my future clam shell projects.  I took one of the large bowls and wrapped it very snugly in Christmas red Saran Wrap with the thought that I would be able to pop the plaster shell off of the clam shell form when I was finished applying plaster of Paris to it,  that did not happen (it was stuck tight).
DIY Giant clam Shell - Plum Creek Place
Once the shell was wrapped with the Saran I covered it with cheese cloth that was cut to size and trimmed at the edges so as not to hang over the lip of the bowl.
DIY Giant clam Shell - Plum Creek Place
I mixed one of the four one pound bags with water per the package instructions that came in the All Purpose Plaster of Paris 4LB size that I had purchased at Walmart (I did not find the four pound size on Walmart's website when I looked for it today) and very quickly applied an even coat of the mixture over the cheesecloth covered bottom of the shell.  If you have good fresh POP it will be hardening within fifteen minutes or so.  One of the bags of plaster did not harden up for several hours,  a pretty good indication that the plaster was not fresh.  The very small print on the box said made in China.  Hmm.....  Maybe they slipped in some old stuff at the factory.  I was letting the plaster dry overnight between the coats anyway so there was no harm done. Between each coat of plaster I placed a layer of cheesecloth to add strength to the shell.
DIY Giant clam Shell - Plum Creek Place
After the last of the four coats of plaster had dried overnight I trimmed out the red saran from the inside part of the bowl with a razor.  That left the plastic interior of the bowl with a good smooth edge transitioning to the plaster.  The plaster edge around the lip of the bowl was shaped first with an old paring knife and then I took the bowl outside to be sanded with fine sand paper for a smooth appearance. The inside of the bowl was spray painted with Rust-Oleum Paint Plus 2X ultra cover in satin finish Heirloom White to give a nice clean sleek appearance to the inside of the bowl like Jenna's inspirational clam shell bowl.  The exterior got two coats of Anita's all purpose acrylic Latte (11128) Craft Paint.  While the second coat of the Latte color paint was still wet I coated the paint heavily with fine gain sand from the craft store to give a coarser finish like the Pottery Barn inspiration bowl with the rough exterior. This is what it looked like after I knocked of the excess sand with a small wire brush and filled the interior with clean aquarium gravel.
DIY Giant clam Shell - Plum Creek Place
I added some coral color bead strands to the surface and then added the shells and candles that you saw in the first picture..
Plum Creek Place - DIY giant clam shell Coral Sunrise Tablescape.

The following "Sunrise" tablescape pictures were actually taken before the pictures from my last tablescape.  I have been enamored with the color coral this summer and wanted to create a pretty white and coral tablescape.  Of course I used the clam shell centerpiece that I had made plus my lovely mermaid along with white rattan chargers from the clearance isle at HomeGoods for three dollars each and the pretty coral and white striped placemats that were on clearance for $4.50  for the four piece set at TJ Max.  A solid white tablecloth added extra brightness to the setting.  Other than that this coral sunrise sunshine table is pretty much the same as the last tablescape I posted.  Just a few pictures and even fewer words for this Tablescape.
Plum Creek Place - Coral Sunrise Tablescape.
The light streams in through the dining room window early in the morning.
Plum Creek Place - Coral Sunrise Tablescape.

Plum Creek Place - Coral Sunrise Tablescape.

Plum Creek Place - Coral Sunrise Tablescape.

Plum Creek Place - Coral Sunrise Tablescape.

Plum Creek Place - Coral Sunrise Tablescape.

Plum Creek Place - Coral Sunrise Tablescape.

Plum Creek Place - Coral Sunrise Tablescape.

Plum Creek Place - Coral Sunrise Tablescape.

Plum Creek Place - Coral Sunrise Tablescape.


Plum Creek Place - Coral Sunrise Tablescape.

Plum Creek Place - Coral Sunrise Tablescape.

Plum Creek Place - Coral Sunrise Tablescape.

Plum Creek Place - DIY giant clam shell Coral Sunrise Tablescape.

Plum Creek Place - Coral Sunrise Tablescape.
The Giant Clam Shell centerpiece was the first of four seashell projects that I wanted to make this summer.  I started a bit late but I am making steady progress on them.  My next post will be on the DIY shell encrusted candle sticks that I made this past week.  There will be a complete tutorial on how to create the candlesticks and a new tablescape.
Shell Encrusted Candlestick Tutorial Preview
From an old Walmart Faux Wood candlestick to a shell encrusted Coastal "By The Sea" look candlestick.
DIY shell encrusted candle sticks - Plum Creek PlaceStop by next week for details on my "Fall tablescaping package" Blogaversary give-a-way.  

FYI - I receive no compensation in any form from any of the brands and places that I mention on my blog.


I will be sharing at:

Jann's Share Your Cup Thursday

Christine's Table It Link Party
 Rustic and Refined
 

Friday, July 31, 2015

Coral and Pink Mermaid Tablescape

While out thrifting earlier this year I found a lovely little mermaid figurine,  her name is Haley from The Sirens Of The Sea Collection from Munro Enterprises issued in 2003.  She is such a pretty little thing,  I knew from the moment I saw her that I would create a Summer "By The Sea" tablescape with her as my centerpiece.     Isn't she Lovely?
Plum Creek Place - Mermaid Tablescape - Haley from The Sirens Of The Sea Collection from Munro Enterprises issued in 2003.
Shades of coral and pink dominate throughout this tablescape.  The thrifted table covering was cut from a four yard piece of coral and white textured polyester,  the pattern on this material reminds me of ocean waves.
Plum Creek Place = Coral and pink Mermaid tablescape
 The shells on the table came from thrift stores and garage sales over the years.
Plum Creek Place = Coral and pink Mermaid tablescape
The wave-like pink taper candles are also a thrift store purchase, as are the polka dot champagne glasses and the pretty pink swirl stemmed sherbert glasses.
Plum Creek Place = Coral and pink Mermaid tablescape
Another un-named mermaid (also thrifted) was placed back to back with Haley within a thrifted shell wreath that has a nest of coral colored beads (the beads were bought from Marc's,  my favorite close-out store).
Plum Creek Place = Coral and pink Mermaid tablescape
Pale coral colored napkins trimmed with creamy white lace were placed beneath shell shaped salad bowls. Pink bottles trimmed with jute twine came from the close out section at Marc's.  The shell shaped "By The Sea Pattern" salad bowls were made by American Atelier.  I bought them off of Ebay many years ago.
Clam shells and sea shells are nice under the candles to catch any dripping wax. Plum Creek Place = Coral and pink Mermaid tablescape

Plum Creek Place = Coral and pink Mermaid tablescape
The polka dot champagne glasses were bought from Goodwill.
Plum Creek Place = Coral and pink Mermaid tablescape

Plum Creek Place = Coral and pink Mermaid tablescape

Plum Creek Place = Coral and pink Mermaid tablescape

Plum Creek Place = Coral and pink Mermaid tablescape

The plain white candles have a piece of material cut and frayed from an extra napkin then glued to the candle with a starfish.  Faux coral was painted with Krylon's "Sunrise" spray paint.


My next post is a tutorial on making a large clam shell centerpiece and another mermaid tablescape (see teaser picture below).

Plum Creek Place - Mermaid Tablescape
 Remember to thrift on ladies,  thrift on.

I will be sharing at: