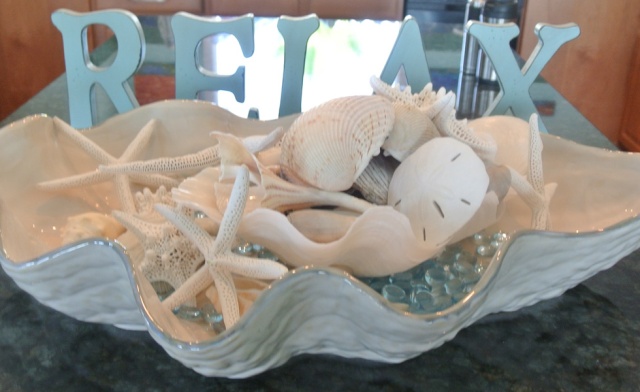
A little bit rough and a little bit sleek, a combination of the inspirational photos that I found while looking for Coastal "By The Sea" pins.
You can see the details about this PB clam shell here - http://www.potterybarn.com/products/giant-clam-shell/ Notice the rough and coarse finish on this PB shell.

You can see Jenna's "Seafood Lunch" post here - http://thepaintedapron.com/2012/09/20/tablescapes-seafood-lunch/ See how beautiful and sleek Jenna's shell looks.

I started with a clear plastic (acrylic?) clam shell bowl. Amazon has a similar bowl like this in white available here at Amazon.
I found two large clam bowls and three smaller ones at a garage sale at a very reasonable price early in the summer. When I saw them I grabbed them up right away for my future clam shell projects. I took one of the large bowls and wrapped it very snugly in Christmas red Saran Wrap with the thought that I would be able to pop the plaster shell off of the clam shell form when I was finished applying plaster of Paris to it, that did not happen (it was stuck tight).
Once the shell was wrapped with the Saran I covered it with cheese cloth that was cut to size and trimmed at the edges so as not to hang over the lip of the bowl.
I mixed one of the four one pound bags with water per the package instructions that came in the All Purpose Plaster of Paris 4LB size that I had purchased at Walmart (I did not find the four pound size on Walmart's website when I looked for it today) and very quickly applied an even coat of the mixture over the cheesecloth covered bottom of the shell. If you have good fresh POP it will be hardening within fifteen minutes or so. One of the bags of plaster did not harden up for several hours, a pretty good indication that the plaster was not fresh. The very small print on the box said made in China. Hmm..... Maybe they slipped in some old stuff at the factory. I was letting the plaster dry overnight between the coats anyway so there was no harm done. Between each coat of plaster I placed a layer of cheesecloth to add strength to the shell.
After the last of the four coats of plaster had dried overnight I trimmed out the red saran from the inside part of the bowl with a razor. That left the plastic interior of the bowl with a good smooth edge transitioning to the plaster. The plaster edge around the lip of the bowl was shaped first with an old paring knife and then I took the bowl outside to be sanded with fine sand paper for a smooth appearance. The inside of the bowl was spray painted with Rust-Oleum Paint Plus 2X ultra cover in satin finish Heirloom White to give a nice clean sleek appearance to the inside of the bowl like Jenna's inspirational clam shell bowl. The exterior got two coats of Anita's all purpose acrylic Latte (11128) Craft Paint. While the second coat of the Latte color paint was still wet I coated the paint heavily with fine gain sand from the craft store to give a coarser finish like the Pottery Barn inspiration bowl with the rough exterior. This is what it looked like after I knocked of the excess sand with a small wire brush and filled the interior with clean aquarium gravel.
I added some coral color bead strands to the surface and then added the shells and candles that you saw in the first picture..
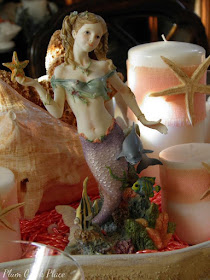
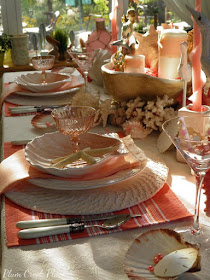
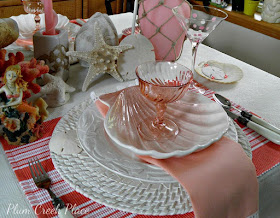
The following "Sunrise" tablescape pictures were actually taken before the pictures from my last tablescape. I have been enamored with the color coral this summer and wanted to create a pretty white and coral tablescape. Of course I used the clam shell centerpiece that I had made plus my lovely mermaid along with white rattan chargers from the clearance isle at HomeGoods for three dollars each and the pretty coral and white striped placemats that were on clearance for $4.50 for the four piece set at TJ Max. A solid white tablecloth added extra brightness to the setting. Other than that this coral sunrise sunshine table is pretty much the same as the last tablescape I posted. Just a few pictures and even fewer words for this Tablescape.
The light streams in through the dining room window early in the morning.
The Giant Clam Shell centerpiece was the first of four seashell projects that I wanted to make this summer. I started a bit late but I am making steady progress on them. My next post will be on the DIY shell encrusted candle sticks that I made this past week. There will be a complete tutorial on how to create the candlesticks and a new tablescape.
Shell Encrusted Candlestick Tutorial Preview
From an old Walmart Faux Wood candlestick to a shell encrusted Coastal "By The Sea" look candlestick.
FYI - I receive no compensation in any form from any of the brands and places that I mention on my blog.
I will be sharing at:
Jann's Share Your Cup Thursday
Christine's Table It Link Party


Oh my! You've given me so many ideas for shell items. I've put them around my mermaids and now I would love to put them on some candlesticks. I hope I can find some! I love your style! And if you get a dollie post ready for next Wednesday....anything to do with dolls....I'll put a link on my Wednesday Wee Ones post! Enjoy your weekend. Hugs, Diane
ReplyDeleteWow Candy! I am beyond IMPRESSED with your shell creations!! Holy cow, I can't believe how fabulous your giant shell turned out!! So cool!!!! Thanks for the link and the reference, I am very flattered to be your inspiration! The shell candlesticks are awesome!!! Can't wait for the tutorial~
ReplyDeleteYour whole table is full of so many great details, and your shell centerpiece is definitely the star of the show!
Jenna
This is all just beautiful!! I'm so impressed with the clam shell you made! Love the pretty mermaid, and I enjoyed seeing her in your last post as well! Great job! "Girl, you are gooood!!!" Keep up the good work!!
ReplyDeleteKatherine
Thank you Jenna, I had been drooling over your beautiful PB shell for a long time, I just love it! The candlesticks are ready for their tablescape but I am having trouble finding a beachy candle to go with the three I already have. I simply have to get out to HomeGoods today.
ReplyDeleteOh Candy I love your creativity! Great ideas! Thanks for sharing and for visiting Quaker Hill Farm!
ReplyDeleteAh-mazing shell that you made so I ditto what everyone is saying here. I love mermaids soo much you would not believe it. Your mermaid is one of the nicest I have seen.
ReplyDeleteSeems like a lot of work, Candy, but all worth it. You shell turned out beautifully and the whole table is fabulous!....Christine
ReplyDeleteYou have done it, again...another very beautifully creative table, Candy! Your giant shell centerpiece is awesome...I can't imagine finding anything that fabulous in a store. I love all the coral touches you have incorporated...the sherbets are so pretty. The candle holders are gorgeous...can't wait for the tutorial.
ReplyDeleteHave a great week.
How impressive!!! Making your own clam shell out of a bowl - you have definitely got imagination and talent! Love what you did with it as a centerpiece for your spectacular tablescape. You've made me want to think more about the colour coral - so pretty and beachy. Thanks for sharing...and your shell encrusted candleholders look terrific as well.
ReplyDeleteWow - amazing. I just love how you made that giant clam shell - so clever. Everything is just wonderful, the dishes and colors are magical. I love the coral color, so fresh and inviting - and of course love the pink glass dishes. It is so refreshing to see your tables - can't wait to see more of your projects.
ReplyDeleteThat's so pretty! I love seashells and ocean decor, although I'm not a huge fan of the beach (more of a lake person).
ReplyDeleteVisiting from the Rustic and Refined Link Up.
Thank you Danielle, I know what you mean about being a lake person, for one thing - no sharks. The Presque Isle beaches on lake Erie are not only stunning to see but a great place to take a family for the "beach experience". We can drive there in just a couple of hours.
DeleteI absolutely love this!! I am thinking of doing a beach tree next Summer as I have tons of shells that I got from my neighbor who lived in Miami during the Winter. You have inspired to do some other things with all those shells!! Thanks so much for the inspiration!!
ReplyDeleteThanks so stopping by!!
Hugs,
Deb
Candy, thank you for your visit to my blog. I will stop by next week for details on your "Fall tablescaping package" Blogaversary give-a-way. The Presque Isle beaches on Lake Erie are one of my favorites!
ReplyDeleteStunning! Absolutely a stunning table. I could just look at this tablescape for hours and admire its beauty. I am sorry I am behind in checking out your wonderful Blog posts. My computer has been giving me grief the whole summer. Had it in the shop a few times. I have it back now, but it isn't working very well. I need a new one, I guess.
ReplyDeleteValarie. Thank you , I have had my share of grief with my computer this year too. I am looking for a new one also.... Candy
ReplyDeleteI have done 3 with concrete was stuff to get out but they turned out very nice
ReplyDelete